Christmas Tree Cake
 |
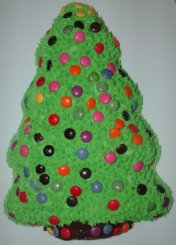
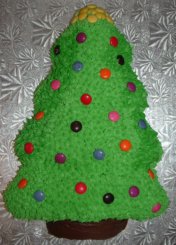
This Christmas tree cake will bring a state of whimsy to any celebration. I have made this with my family so many times over the years. It is fun and easy to make and looks amazing on the dessert table. There are so many different ways to create your design with this cake, but with that said I often have my kids help and it often looks just like the ones in the pictures here. Chocolate cake, green icing and M&Ms. What a wonderful combination. |
 |
This Christmas tree cake will bring a state of whimsy to any celebration. I have made this with my family so many times over the years. It is fun and easy to make and looks amazing on the dessert table. There are so many different ways to create your design with this cake, but with that said I often have my kids help and it often looks just like the ones in the pictures here. Chocolate cake, green icing and M&Ms. What a wonderful combination.
 |
 |
It all started when I started collecting Wilton shaped cake pans. I found this Christmas tree cake pan and thought that it could be used for so many different things. Of course the obvious is making cakes, jello mold, snack tray for popcorn and chocolates, or even hand it on your wall in your kitchen to add a little playfulness in your seasonal decorating decor.
I made this fun Christmas Tree Cake with my kids this past holiday season. It was really easy. The kids wanted a chocolate cake, so we mixed up a regular chocolate cake mix. It was the regular box type that you only needed to add egg, vegetable oil and water. I then sprayed the pan with Pam. Pam is a cooking spray. I must admit I was worried that it may stick given that there are so many ridges for the different levels of branches. To alleviate this concern I did add a little extra cooking spray, so the cake would pop out easily. Thinking about it after I could probably have used some natural oil and flour, but I didn’t want to take a chance. In the future I would probably use the extra cooking spray again because it was an easy solution. I mixed up the batter and poured it into the Christmas tree cake pan. I always use a spatula to get all the batter into the pan. Then with the spatula I try to spread out and level the batter. Then I bounce the pan on the pan on the counter. I do this to get any air bubbles out of the batter before cooking.
I baked the cake, as per the instructions from the package and let it cool in the pan for about 15-20 minutes. When the cake is left for this short amount of time it will naturally shrink and separate from the pan. Next I cut the cake across the bottom of the pan. There often is a spot that rises more than the rest and it will help level out the cake. After the cake had shrunk this small amount and been leveled, I placed a cooling rack on the pan and then flipped it over. Again I waited a couple of extra minutes and then I pulled up the pan and the cake slid out perfectly. I then waited until the cake was completely cooled before icing the cake.
I used regular chocolate icing for the trunk of the tree and applied it using a regular spatula from Wilton. I next mix up the green icing. Make sure you make enough so that the color will be the same throughout the cake. With a spatula or icing knife add a thin layer of icing, like a crumb base layer of green icing. If you want the cake to have different shades of green, make up three different shades in different bowls. Then spread out the green icing beside each other. Once this is done then place it into a piping bag. Then for the green icing I have a special tip #2010 (Wilton) that has three tips in one. It looks similar to tip #18 or Tip #21, it is just three times as quick. This icing tip will make a small star or flower like design. To make the green icing I used a vanilla icing and dyed it the color Leaf Green (Wilton). Pipe in all of the icing and then if needed add a small lettering tip to add in any small gaps.
The best part is when my kids helped covering the cake with Smarties or M&Ms. Place the M&Ms into a bowl. This makes it easier to see the different colors. We did then pull the yellow candies and placed them into a separate bowl. This way it made it easy and quick to create the star area. Then we randomly grabbed the chocolate candies to add on the lights or ornaments to the Christmas tree. The most difficult part is to not eat all the candies while decorating the cake.
 |
 |


My kids love candy on cakes and it really looks fantastic. Then, when the other kids at the holiday party saw the cake their eyes lit up and smiles appeared on all their faces. I am thrilled that I found this Christmas tree cake pan. I am sure I will make this seasonal cake many years in the future.