Little Mermaid Cake
 |
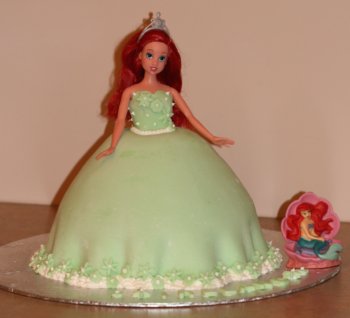
I made this Little Mermaid cake for my daughter’s birthday party. I always loved the little mermaid myself. My nana bought me the DVD when I was young and I would have done anything to be Ariel. So when I had a daughter I really hoped that she would also love Disney's creation of the Little Mermaid. There are so many people that would be able to relate to Ariel. She dreams of a different life that she is living. For her it started out that she was excited to make new discoveries, like what human tools and characteristics mean. Then she discovers some of the mysteries of magic. And then she moves to a distant land. All sorts of people would love to live their dreams. |
For my daughter we created an under the sea theme for her party. We had mylar balloons and streamers. Lots of games and activities, but the center and exciting part was the beautiful little mermaid cake.

I made this Little Mermaid cake for my daughter’s birthday party. I always loved the little mermaid myself. My nana bought me the DVD when I was young and I would have done anything to be Ariel. So when I had a daughter I really hoped that she would also love Disney's creation of the Little Mermaid.
There are so many people that would be able to relate to Ariel. She dreams of a different life that she is living. For her it started out that she was excited to make new discoveries, like what human tools and characteristics mean. Then she discovers some of the mysteries of magic. And then she moves to a distant land. All sorts of people would love to live their dreams.
For my daughter we created an under the sea theme for her party. We had mylar balloons and streamers. Lots of games and activities, but the center and exciting part was the beautiful little mermaid cake.
How to Make the Ultimate Little Mermaid Cake
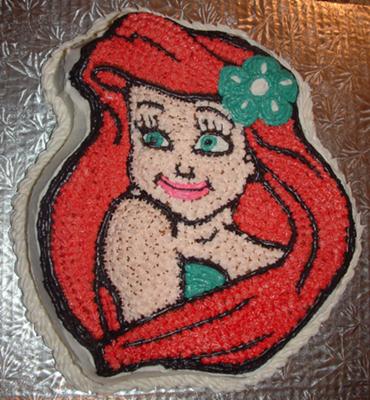
The first cake that was a character cake was this Ariel Cake from the Little Mermaid. It was a lot easier than I had expected. I rented the Little Mermaid Cake Pan from a local Bulk Food Store for $1.99. I had to also purchase 3 icing tips (each were just a couple of dollars). I figured I would just take it one step at a time and I am thrilled with the outcome.
I sprayed the Little Mermaid Cake Pan (Wilton Cake Pan) really well with Pam. Being that it has all the grooves for the design I wanted to make sure it was going to not stick while cooking. Mix up the batter of your choice and bake following the little mermaid cake pan instructions (350 degrees for 30 to 40 minutes). Once the time was up I checked with a toothpick to make sure the batter was fully baked. I let it cool for about 10 minutes, until the sides naturally release from the sides. Then I leveled the cake pan with a serrated knife. I then placed a cooling rack on the pan and flipped the cake over to the right side up. I waked a few minutes and then lifted the pan off of the cake. I was thrilled it slipped out perfectly.
The Ariel Birthday Cake Pan had left the lines indented into the cake. I used the Wilton round icing tip number 3 to make the lines on the cake with black, white and teal icing. This way it gave me a great visible guideline. Around the eye you will want to make it look smooth. Then I used a mixture of cornstarch and warm water. I was told it would work better if the water was warm. Dip your finger in and smooth out the icing around Ariel’s eye. The hair will then be made using the Wilton icing tip number 16. This tip will make a star shape and using the reddish icing will look amazing. It now starts to really come together. Then I used the same icing tip number 16 to make the purple in Ariel’s bathing suit. Next I had to finish her skin. I used the same tip number 16. I used a vanilla buttercream icing and added copper coloring to dye the icing to try to match Ariel’s skin color. I then went back and put more icing on Ariel’s eyelashes. It made me giggle a little because I felt like I was touching up her makeup. To finish off the cake I needed to cover the base. Originally I had put vanilla icing on the sides using an angled spatula, but there was still a small gap between the cake and serving platter. I used Wilton icing tip number 21 around the base of the cake. The tip number 21 makes a shell design. You squeeze the icing and make a bit of a ball and then you pull to the side. You repeat it over and over again until you have gone all the way around the cake.
The cake pan came with Wilton cake decorating instructions and how to use the different tips, how to bake the cake, etc. I was surprised to see that this character cake was just like coloring a picture. I found the experience very relaxing and I am so proud of my first character cake. Everyone just loved my Little Mermaid Birthday Cake.


It feels so good to try new things. I had thought that it would be fun to make these unique cakes for my kids' birthdays. When I was trying this I took my time and tried to enjoy all the steps. The cherry on top was definitely seeing my kids' faces when the cake was completed. It was thrilling for all of us.
Best of luck making your very own little mermaid cake.
Related Party and Cake Ideas
 Barbie Cake |
 Barbie Cake | |
