Winnie The Pooh Cake Idea
 |
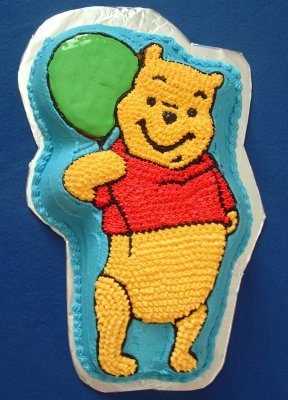
This Winnie the Pooh birthday cake reminds me of the movie when Pooh bear is being the little black rain cloud and is flying up, up to the honey tree. Too cute – have a Winnie the Pooh birthday cake and to compliment the cake have cupcakes with bees, honey pots and the other Winnie the Pooh characters. My daughter had a Winnie the Pooh birthday party when she was turning one because I LOVE Winnie the Pooh! I am always pleasantly surprised to see how straight forward the Wilton cake pan is to use and to follow the instructions. This was at the beginning of when I started making these types of cakes. I always think that the most important part is the taste when the cake is completed, but equally important is that the cake is able to easily come out of the cake pan. Make sure you use ample non-stick spray to get into all the crevices of the cake pan. If you wish you are able to use solid shortening and flour to make it non-stick, but I find the cooking spray easier and a quicker alternative. |
This Winnie the Pooh birthday cake reminds me of the movie when Pooh bear is being the little black rain cloud and is flying up, up to the honey tree. Too cute – have a Winnie the Pooh birthday cake and to compliment the cake have cupcakes with bees, honey pots and the other Winnie the Pooh characters. My daughter had a Winnie the Pooh birthday party when she was turning one because I LOVE Winnie the Pooh!

I am always pleasantly surprised to see how straight forward the Wilton cake pan is to use and to follow the instructions. This was at the beginning of when I started making these types of cakes. I always think that the most important part is the taste when the cake is completed, but equally important is that the cake is able to easily come out of the cake pan. Make sure you use ample non-stick spray to get into all the crevices of the cake pan. If you wish you are able to use solid shortening and flour to make it non-stick, but I find the cooking spray easier and a quicker alternative.
How to Make the Ultimate Winnie the Pooh Cake
This Winnie the Pooh cake was made from a regular yellow cake mix. I figured that it would coordinate well with any flavor of ice cream. I baked the cake at 350 degrees and it took about 35 minutes (they suggest between 30-40 minutes). I recommend testing the cake with a toothpick. If it comes out clean it is baked completely and if there is still batter it needs more time. All ovens cook at slightly different rates.
I made a nice buttercream icing. I made it extra thick to add some detail into the cake. I decided that I wanted the outside of my Winnie the Pooh character to be blue, so it would look like he was flying up into the sky. I used the decorating tip number 789 with the smooth side out. It has grooves on one side if you wish to have layered horizontal or vertical lines, and the other side will make our cake smooth. Or you could use decorating tip number 47 to either get the exact same result or to make a basket weave result. If you use the smaller tip you will go around your cake three times to get the height. As I said I wanted the outside to look smooth like the sky. Both of those tips are great so that your cake will not show crumbs. If you need, you are still able to smooth your icing surface again with an angled spatula.
Next, I switched to black icing (tinted from chocolate icing) and the small round decorating tip number 3. I did all my outlines of the Pooh character and also piped in the face of Pooh bear. After this was completed I went back to my outside blue color and put on the decorator tip number 5. I filled in the rest of the blue filling right up to the black outline.
Next, I made the red star design on Winnie the Pooh’s shirt. Red is a difficult color to create. I recommend that you tint your icing pink and then make red. Think about when painting, you first put on primer before you paint. To make the star design I used the star decorator tip number 16. Then, I used the same star tip 16 to create the fur on Winnie the Pooh. To make the star shape you want to squeeze your icing close to your cake and then stop squeezing before you pull your icing bag away. If you pull up too quickly you might have points on your stars. The design is totally up to your taste. If you accidentally have pointed stars and want to change the look, mix a bowl of warm water with cornstarch. Apply this mixture with your finger. Just lightly tap the top of your star and it will not be pointed any more. Again this is totally a design decision as both types of piping will look great.
To finish off my Winnie the Pooh cake I made the balloon green. I used the decorating tip number 5 and then in an egg cup I mixed a small amount of cornstarch with warm water. I dipped my finger in the mixture and tapped down the green color. It will make the balloon look smooth and shiny. The other option that would look amazing would be to use a gel icing for the balloon. The balloon also could be any color. Think about what colors you like and would match your party theme. I was making green cake pops on the side and thought the green balloon would be perfect.
 |
 |


I loved the way the Winnie the Pooh cake turned out. After I finished making the cake I looked out my kitchen window and thought of Christopher Robin. It looked a little cloudy and all I could say was “tut, tut, it looks like rain”.
